Two crossbody bags can be cut from the same fabric and look identical in a product photo, then diverge completely after six months of daily use. One still zips smoothly and holds its shape; the other has a jammed slider, a strap pulling loose at the tab, and seams that gape when the bag is full. The difference is almost never the fabric. It is the hardware and the stitching, the parts a spec sheet leaves vague and a sample reveals in seconds. If you are ordering branded crossbody bags in any quantity, these are the details worth pinning down before the run.
Zippers: gauge and type do the heavy lifting
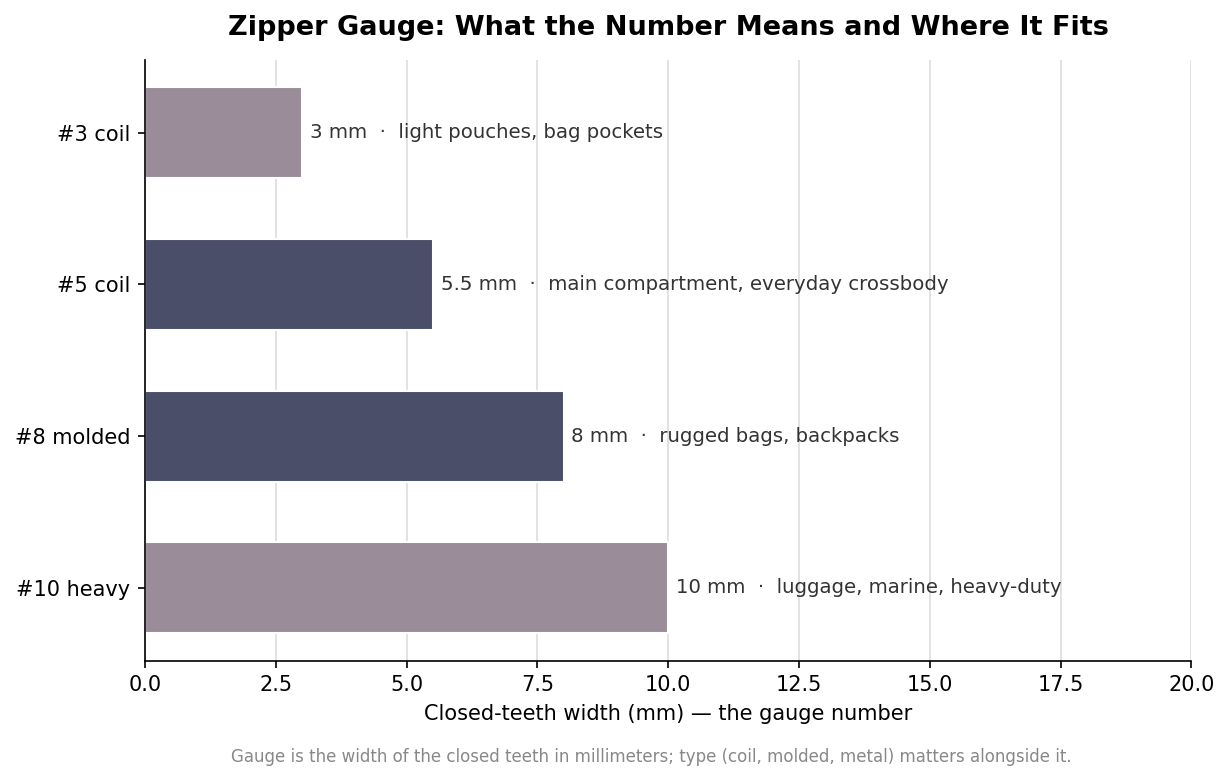
A zipper is described by a gauge number, and that number is simply the width of the closed teeth in millimeters. A number three runs about three millimeters, a number five around five and a half, a number eight about eight, and a number ten roughly ten. Bigger teeth are stronger and stiffer, but stiffer is not automatically better on a soft bag. For a typical crossbody, a number three or number five carries the main compartment comfortably, and you only need to step up to a number eight if the bag is genuinely rugged or routinely overstuffed.
Type matters as much as gauge. A coil zipper, made of coiled nylon, is flexible, light, and curves smoothly around a rounded bag opening, which is why it is the default on most crossbodies. A molded plastic zipper is more rigid and holds up better to sun and weather, suiting outdoor and heavier bags. Metal zippers resist abrasion and look premium but add weight and can feel stiff. Whatever you choose, name a reputable zipper maker in the spec rather than leaving it open; brands like YKK are specified by name precisely because the slider, not the tape, is where cheap zippers fail first.
Stitching is invisible until it fails
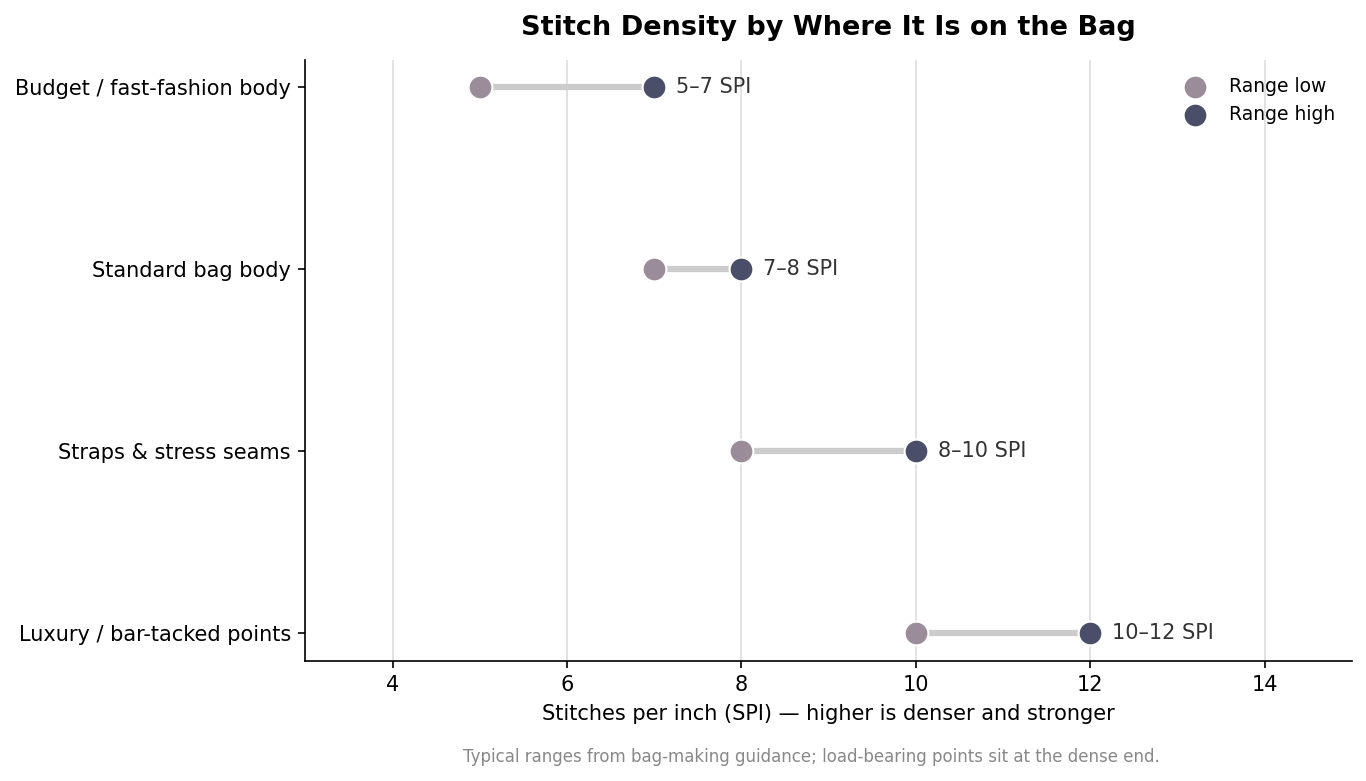
Stitch density is measured in stitches per inch, and it is one of the quietest cost-cutting levers a factory has. A standard bag body is well served by seven to eight stitches per inch, straps and stress seams want eight to ten, and refined work runs ten to twelve. Budget production drops to five to seven, which uses less thread and sews faster but punches fewer, longer stitches that carry load less evenly and pull out sooner. The trap is that a loose stitch looks perfectly fine on the shelf and only reveals itself under a full bag months later.
Thread is the other half of the seam. Bonded nylon is the workhorse for bags, and load-bearing seams should move to a heavier bonded thread rather than the fine thread used on light panels. Thread and needle have to match the stitch plan, too: crank the density up toward twelve stitches per inch with a thin thread and an oversized needle and you perforate the fabric into a tear line, so density, thread weight, and needle size are one decision, not three. Ask for the stitch count and the thread type in writing, then confirm both on a sample; you can count stitches against a ruler in a few seconds, and it is the single easiest quality check a buyer can run.
The hardware you never think about
The strap of a crossbody bag lives and dies by its small metal parts: the swivel snap hooks at each end, the D-rings they clip to, and the tri-glide adjuster that sets the length. Plastic versions are lighter and cheaper, but the gate spring on a plastic snap hook and the teeth on a plastic adjuster are common failure points, and a slipping adjuster that will not hold its setting is a daily annoyance no customer forgives. Metal hardware, usually a zinc alloy, costs a little more and adds a little weight, and it is almost always worth it on the parts that bear the strap. Pay attention to how the D-ring is anchored as well as to the ring itself: a solid ring stitched onto a flimsy fabric tab simply moves the failure from the metal to the cloth. Check that the snap-hook gate closes firmly, that the ring tab is bar-tacked to the body, and that the adjuster grips the webbing without creeping when you hang weight on it.
Where bags actually fail, and how to spec against it
Failures cluster at attachment points, not in the middle of a panel. The place where the strap tab meets the body, the anchor for a D-ring, the corners of the zipper opening, and the base seams take the most repeated load, and those are the spots to reinforce on purpose. The tool for it is the bar tack, a dense cluster of back-and-forth stitches that locks a strap or tab in place, and a box-X pattern where webbing joins the body spreads load across the joint instead of concentrating it on one line of thread. Reinforced or boxed corners keep a full bag from splitting at the base. Spell these out: bar-tacked strap anchors, a box-X on every webbing junction, and reinforced lower corners.
Put it in the spec, then pull a sample
All of this becomes a short list of spec lines: zipper gauge, type, and brand; stitch density for the body and for stress seams; thread type; hardware material; and the exact locations that must be bar-tacked. Once the factory has built to that spec, order a pre-production sample and abuse it before you approve the run. Load it past what any customer would, yank the strap, cycle the zipper fifty times, and tug the adjuster under weight. A sample catches in an afternoon the weaknesses that a thousand-unit order would otherwise teach you one warranty complaint at a time.