Category: Uncategorized

  • How to Spec a Custom Crossbody Bag Order: A Tech-Pack Walkthrough

    How to Spec a Custom Crossbody Bag Order: A Tech-Pack Walkthrough

    The gap between a custom crossbody bag that arrives right and one that arrives wrong is almost never the factory’s competence. It is the specification. A supplier builds what the document tells it to build, and where the document is vague, the factory makes the cheapest defensible choice on your behalf. A tech pack is simply the practice of removing those blanks: writing down every number so there is an objective standard the sample is measured against. Here is how to spec a bulk crossbody order so the production run matches the sample you approved.

    Dimensions and tolerances

    Start with a full set of measured dimensions, not a sketch. Every panel size, pocket size, seam allowance, and strap length gets a number, and every number gets a tolerance. The industry norm for soft goods is about plus or minus 5 mm, tightened to roughly plus or minus 2 mm on rigid panels and anywhere hardware attaches, because a base plate or a magnet that drifts 5 mm will not line up with its mate. Specify strap drop under load rather than flat, since webbing and leather stretch in use; a common way to write it is the drop measured with a 2 kg load, for example around 26 cm. Locate logos and hardware with X/Y coordinates from a fixed seam, such as 50 mm down from the top seam, instead of instructions to “center” them, which every operator centers differently.

    Materials, coating, and color

    Name the fabric by denier, weave, and coating, not by feel. A “600D polyester” with a PU coating is a specification; “sturdy fabric” is a wish. State the coating type and thickness, any backing or laminate, and whether the lining differs from the shell. Color is where orders quietly go sideways: specify Pantone codes, not descriptive names, because “navy” spans a dozen shades and the factory will pick one. If a water-repellent finish or a particular hand is part of the promise, write it into the material line so it survives into production and is not value-engineered out of the run. It is also worth stating a fabric weight or thickness range alongside the denier, since two fabrics can share a denier rating and still differ noticeably in body and drape depending on how the yarn is woven and coated.

    Hardware and the zipper you name

    Hardware is the single most under-specified section of most tech packs, and the zipper is the worst offender. “A zipper” is not a spec. Name the gauge, the coil type, and the puller, for example a #5 nylon coil zipper with a metal puller. The gauge number corresponds roughly to the coil width in millimeters, and it should match the bag’s weight and use.
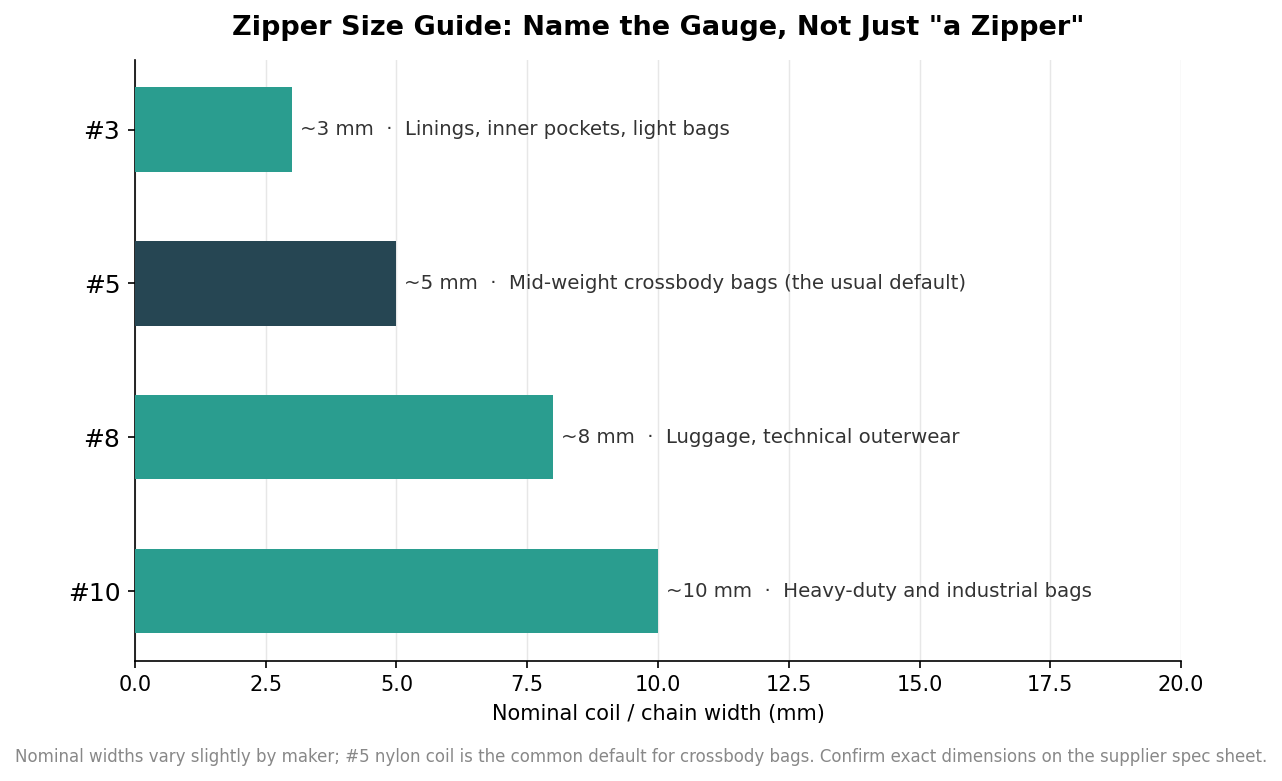
    Horizontal bar chart of zipper coil width by size: #3 about 3mm for linings, #5 about 5mm for crossbody bags, #8 about 8mm for luggage, #10 about 10mm for heavy-duty bags.
    Zipper gauge maps roughly to coil width in millimeters; #5 nylon coil is the usual crossbody default.

    For most crossbody bags a #5 coil is the sensible default: sturdy enough for daily open-and-close, not so heavy it fights a light bag. Reserve #8 and #10 for luggage-weight builds. Then specify the rest of the metal the same way, calling out D-rings, sliders, buckles, rivets, and feet by size, finish, and plating, and set a corrosion standard for them, such as a salt-spray test to ASTM B117 for a defined number of hours. Cheap plating is invisible in the sample and obvious three months later.

    Construction: stitching, seams, and reinforcement

    Construction quality lives in numbers a photo cannot show. Specify stitches per inch, because it is a real trade-off rather than a “more is better” dial. Roughly 8 to 10 SPI is typical for structural bag seams, but the right figure moves with fabric weight: lighter linings take more stitches per inch, while heavy 1000-denier fabric wants fewer, since too many perforate the material into a tear line.
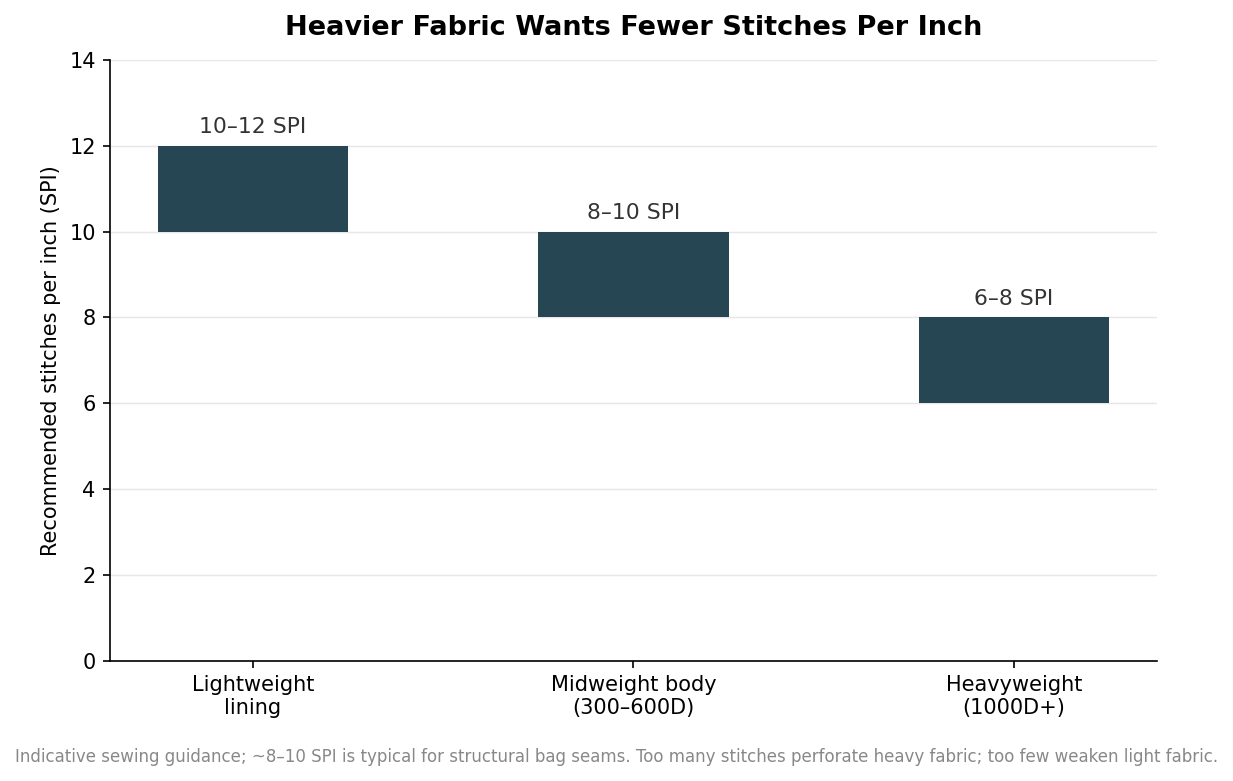
    Range column chart of recommended stitches per inch by fabric weight: lightweight lining 10 to 12, midweight 300 to 600 denier 8 to 10, heavyweight 1000 denier plus 6 to 8.
    Recommended stitches per inch drops as fabric gets heavier; ~8 to 10 SPI is typical for structural bag seams.

    Beyond SPI, call out seam allowances, mandatory backtacks at stress points, and exactly where reinforcement belongs, at strap anchors, zipper ends, and base corners, which are the points that fail first under a full load. If interior structure matters, an interior section drawing is the only place to show stabilizers, foam, or a base board and how the seams are layered. Leaving that to the factory’s judgment is how two “identical” orders end up feeling different in the hand.

    Branding and the quality bar

    Finish the pack with two things buyers often treat as afterthoughts. First, branding: give logo placement as coordinates, size, Pantone colors, and the application method, whether screen print, heat transfer, embroidery, or a woven label, because each renders detail differently and each has its own minimum legible size. Second, and most important for a bulk run, set the quality bar in testable terms. Define the load and drop tests the bag must survive, for instance a strap holding 10 kg suspended for four hours with under 5 percent elongation, and name an AQL inspection level so acceptance is a measured decision rather than an argument. AQL 2.5 for major defects is a common general-merchandise setting; whatever you choose, it tells the factory how many defects in a sampled lot are acceptable before the shipment is rejected.

    None of this requires a designer’s software; a clear table of numbers and a couple of dimensioned drawings will do. The figures cited here are drawn from published bag-manufacturing and tech-pack guidance and are indicative starting points, not universal rules, so adjust them to your fabric, use, and price target. What does not change is the principle: every blank you leave in the spec is a decision you have handed to someone whose incentive is to spend less than you would. Fill the blanks, and the run comes back looking like the sample. Keep the approved sample and its signed spec together as the reference for the whole production run, and inspect the shipment against that same document rather than against memory of the sample.
  • The Hardware and Stitching That Decide Whether a Crossbody Bag Lasts

    The Hardware and Stitching That Decide Whether a Crossbody Bag Lasts

    Two crossbody bags can be cut from the same fabric and look identical in a product photo, then diverge completely after six months of daily use. One still zips smoothly and holds its shape; the other has a jammed slider, a strap pulling loose at the tab, and seams that gape when the bag is full. The difference is almost never the fabric. It is the hardware and the stitching, the parts a spec sheet leaves vague and a sample reveals in seconds. If you are ordering branded crossbody bags in any quantity, these are the details worth pinning down before the run.

    Zippers: gauge and type do the heavy lifting

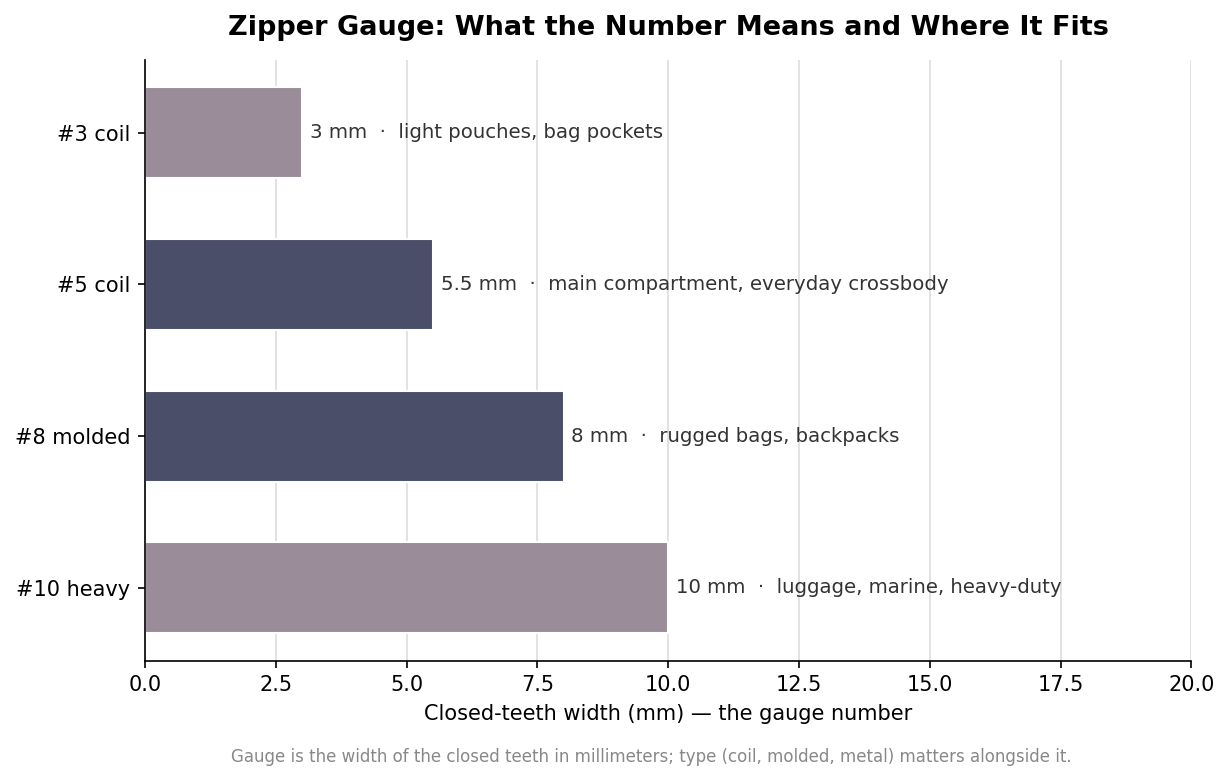
    Horizontal bar chart of zipper gauge tooth widths in millimeters for number 3, 5, 8, and 10 zippers with typical bag uses
    Zipper gauge is the tooth width in millimeters; most crossbodies live at #3 to #5.

    A zipper is described by a gauge number, and that number is simply the width of the closed teeth in millimeters. A number three runs about three millimeters, a number five around five and a half, a number eight about eight, and a number ten roughly ten. Bigger teeth are stronger and stiffer, but stiffer is not automatically better on a soft bag. For a typical crossbody, a number three or number five carries the main compartment comfortably, and you only need to step up to a number eight if the bag is genuinely rugged or routinely overstuffed.

    Type matters as much as gauge. A coil zipper, made of coiled nylon, is flexible, light, and curves smoothly around a rounded bag opening, which is why it is the default on most crossbodies. A molded plastic zipper is more rigid and holds up better to sun and weather, suiting outdoor and heavier bags. Metal zippers resist abrasion and look premium but add weight and can feel stiff. Whatever you choose, name a reputable zipper maker in the spec rather than leaving it open; brands like YKK are specified by name precisely because the slider, not the tape, is where cheap zippers fail first.

    Stitching is invisible until it fails

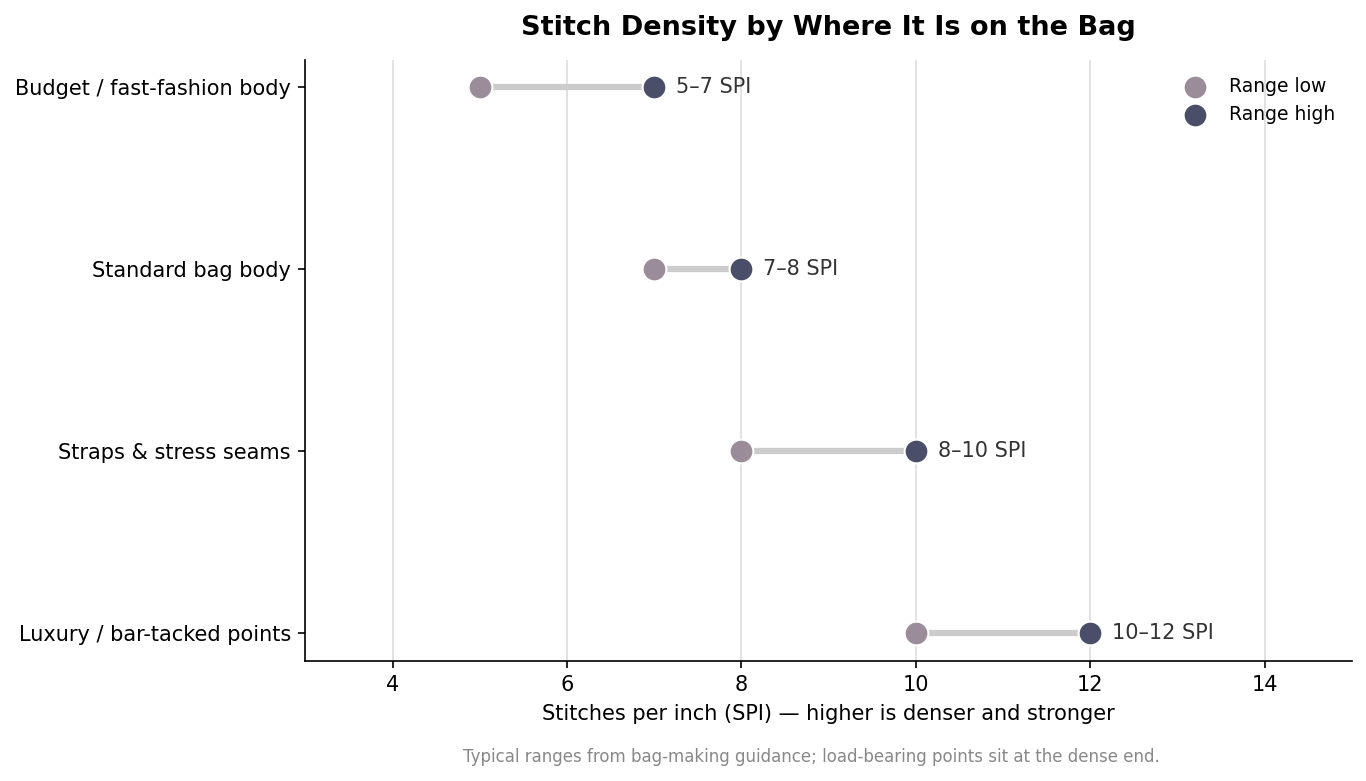
    Dumbbell chart of recommended stitches-per-inch ranges for budget bodies, standard bodies, stress seams, and bar-tacked points
    Recommended stitch density rises as the seam takes more load.

    Stitch density is measured in stitches per inch, and it is one of the quietest cost-cutting levers a factory has. A standard bag body is well served by seven to eight stitches per inch, straps and stress seams want eight to ten, and refined work runs ten to twelve. Budget production drops to five to seven, which uses less thread and sews faster but punches fewer, longer stitches that carry load less evenly and pull out sooner. The trap is that a loose stitch looks perfectly fine on the shelf and only reveals itself under a full bag months later.

    Thread is the other half of the seam. Bonded nylon is the workhorse for bags, and load-bearing seams should move to a heavier bonded thread rather than the fine thread used on light panels. Thread and needle have to match the stitch plan, too: crank the density up toward twelve stitches per inch with a thin thread and an oversized needle and you perforate the fabric into a tear line, so density, thread weight, and needle size are one decision, not three. Ask for the stitch count and the thread type in writing, then confirm both on a sample; you can count stitches against a ruler in a few seconds, and it is the single easiest quality check a buyer can run.

    The hardware you never think about

    The strap of a crossbody bag lives and dies by its small metal parts: the swivel snap hooks at each end, the D-rings they clip to, and the tri-glide adjuster that sets the length. Plastic versions are lighter and cheaper, but the gate spring on a plastic snap hook and the teeth on a plastic adjuster are common failure points, and a slipping adjuster that will not hold its setting is a daily annoyance no customer forgives. Metal hardware, usually a zinc alloy, costs a little more and adds a little weight, and it is almost always worth it on the parts that bear the strap. Pay attention to how the D-ring is anchored as well as to the ring itself: a solid ring stitched onto a flimsy fabric tab simply moves the failure from the metal to the cloth. Check that the snap-hook gate closes firmly, that the ring tab is bar-tacked to the body, and that the adjuster grips the webbing without creeping when you hang weight on it.

    Where bags actually fail, and how to spec against it

    Failures cluster at attachment points, not in the middle of a panel. The place where the strap tab meets the body, the anchor for a D-ring, the corners of the zipper opening, and the base seams take the most repeated load, and those are the spots to reinforce on purpose. The tool for it is the bar tack, a dense cluster of back-and-forth stitches that locks a strap or tab in place, and a box-X pattern where webbing joins the body spreads load across the joint instead of concentrating it on one line of thread. Reinforced or boxed corners keep a full bag from splitting at the base. Spell these out: bar-tacked strap anchors, a box-X on every webbing junction, and reinforced lower corners.

    Put it in the spec, then pull a sample

    All of this becomes a short list of spec lines: zipper gauge, type, and brand; stitch density for the body and for stress seams; thread type; hardware material; and the exact locations that must be bar-tacked. Once the factory has built to that spec, order a pre-production sample and abuse it before you approve the run. Load it past what any customer would, yank the strap, cycle the zipper fifty times, and tug the adjuster under weight. A sample catches in an afternoon the weaknesses that a thousand-unit order would otherwise teach you one warranty complaint at a time.

  • Custom Crossbody Bag Materials: Fabric, Denier, and Decoration Explained

    Custom Crossbody Bag Materials: Fabric, Denier, and Decoration Explained

    Two crossbody bags can look identical on a product photo and behave nothing alike in a customer’s hands. The difference is almost always the material: the fabric of the shell, the coating behind it, the hardware at the stress points, and the decoration method that puts your logo on the front. If you are ordering custom crossbody bags in any quantity, understanding those inputs is what lets you match the bag to the job instead of guessing from a swatch. This is a working deep-dive into what these bags are actually made of and how each choice changes the result.

    Denier is the number that decides durability

    Most technical bag fabrics are described by a denier rating, written as a number followed by “D,” such as 210D or 600D. Denier measures the thickness of the individual yarns woven into the fabric, and as a rough rule, a higher denier means a heavier, more abrasion-resistant, more structured cloth. It is not a perfect proxy for quality because weave density and coating matter too, but it is the single most useful shorthand a buyer has. The trade-off is always durability against weight. A bag that survives years of daily abuse also sits heavier on the shoulder, and for a crossbody worn against the body all day, that weight is felt.

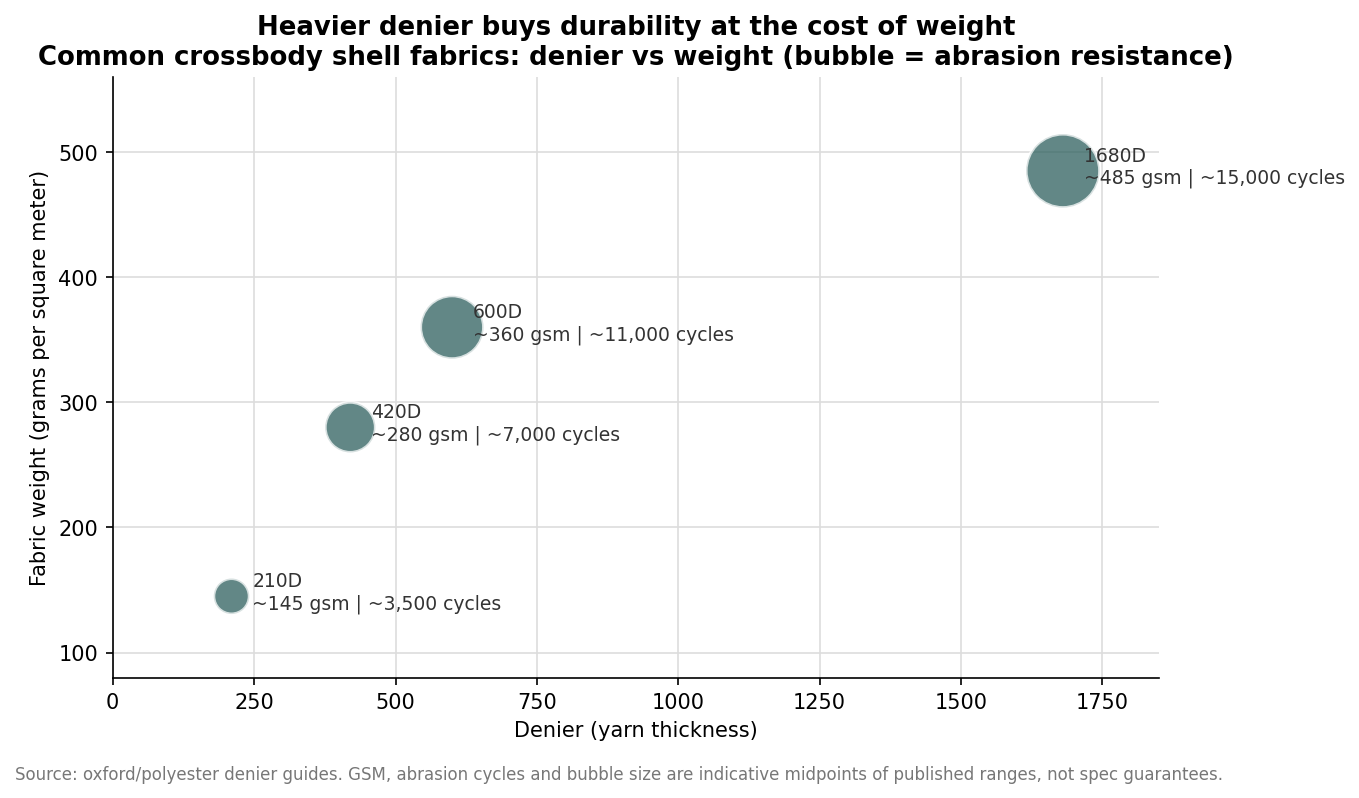
    In practice, four deniers cover most of the crossbody market. A 210D fabric is light and soft, typically around 110 to 180 grams per square meter, and it belongs in linings, packable bags, and pocket panels rather than an outer shell that takes daily wear. A 420D fabric, usually in the 260 to 300 gram range, is the sweet spot for everyday bags that need to feel substantial without turning stiff. A 600D fabric, roughly 340 to 380 grams, is the industry workhorse: it holds its shape, resists years of contact, and coats well for water resistance. A 1680D ballistic fabric is heavy-duty to the point of being overkill for most crossbodies, and well-designed bags tend to place it only at corners and bases rather than across the whole body. The chart below maps these fabrics by weight and abrasion resistance so the trade-off is visible at a glance.

    Bubble scatter chart of crossbody bag fabrics plotting denier against fabric weight in gsm, bubble size showing abrasion resistance
    Higher denier means more durability but more weight; bubble size reflects abrasion resistance.

    Nylon, polyester, canvas, and the coating behind them

    Denier describes the yarn, but the fiber matters too. Polyester is the default for promotional and mid-market bags because it holds printed color well, resists UV fading, and costs less. Nylon of the same denier is generally stronger and more abrasion-resistant, with a softer hand, which is why it shows up in premium and outdoor-leaning bags, though it can absorb more water unless treated. Cotton canvas is a different animal entirely, sold by ounce weight rather than denier, with 6 to 16 ounces per square yard covering everything from light totes to structured bags; a 6-ounce canvas gives that natural, casual look many lifestyle brands want. Recycled polyester, often labeled RPET and frequently made from 50 percent or more post-consumer material, has become common and lets a bag carry a sustainability story without a meaningful drop in performance.

    Water resistance rarely comes from the fabric alone. It comes from a coating applied to the back, usually polyurethane or TPU, plus how the bag is built. A “water-resistant” bag and a “waterproof” bag are not the same claim. Most crossbody bags are water-resistant: the coated fabric and a rain flap over the zipper shed a shower, but seams and zipper teeth are still entry points. True waterproofing requires sealed or welded seams and a proper waterproof zipper, which adds cost and stiffness most everyday bags do not need. When a supplier quotes water resistance, it is worth asking specifically whether they mean a coated fabric, a covered zipper, or fully sealed construction, because those are three different levels of protection.

    The hardware quietly determines how long it lasts

    Fabric gets the attention, but crossbody bags usually fail at the hardware first. The zipper is the most-used moving part, and a smooth, branded zipper from a reputable maker is one of the clearest tells of a quality bag; a cheap zipper that separates or jams ends the bag’s life regardless of how good the cloth is. The strap connection points, the swivel hooks, D-rings, and slider that let a wearer adjust the drop, take constant load and should be metal on anything meant to last, with plastic acceptable only on lightweight, low-cost pieces. Stitching at the strap anchors is the other common failure point, and reinforced bar-tacking there is worth confirming. None of this shows up in a catalog photo, which is exactly why it is worth writing into a spec.

    Decoration changes cost more than you expect

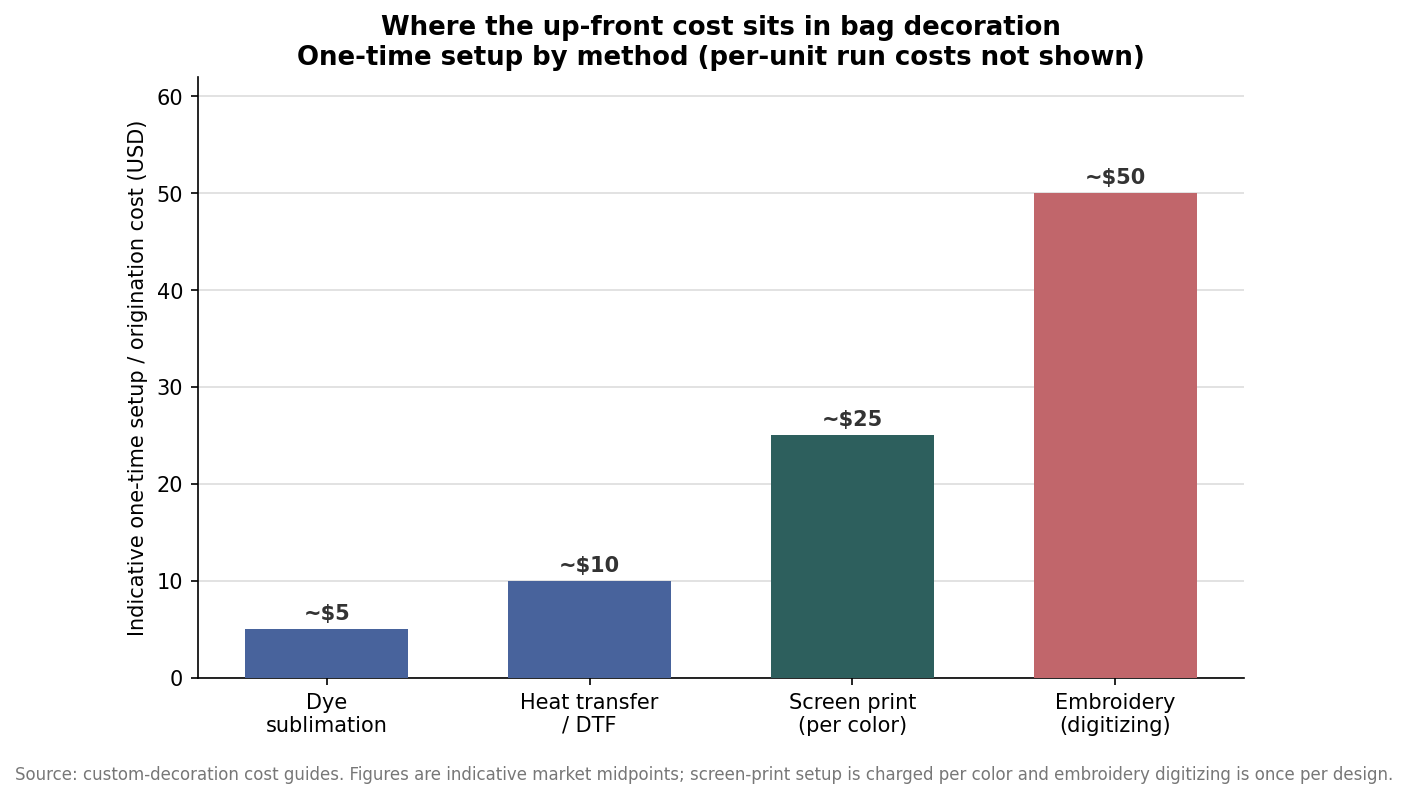
    How your logo goes onto the bag affects both the look and the economics of the order, and the biggest surprise for first-time buyers is usually the up-front setup cost. Screen printing lays down durable, opaque ink and is economical at volume, but it charges a setup fee per color, so a three-color logo carries three setup charges before a single bag is printed. Embroidery reads as premium and holds up to washing and abrasion better than almost anything, but it requires a one-time digitizing fee to convert your artwork into a stitch file, and it is best for logos rather than fine detail or gradients. Heat transfer and DTF printing carry very low setup and reproduce full-color artwork cleanly, which makes them ideal for small runs and complex graphics, at the cost of a print that sits on the surface rather than in the fabric. Dye sublimation produces vivid, permanent, full-bleed color but works only on polyester and only on light backgrounds. The chart below shows where the one-time setup cost lands for each method.

    Bar chart of indicative one-time setup cost by bag decoration method: sublimation, heat transfer, screen print, embroidery
    One-time setup cost varies widely by decoration method, which is why method should follow order size.

    The practical reading of that chart is that method should follow order size and artwork. For a large run of a simple one or two-color logo, screen printing’s setup cost is amortized quickly and the per-unit price wins. For a small run, a photographic design, or a rush job, heat transfer or DTF avoids the setup entirely and gets you a clean full-color result. Embroidery is the choice when the bag needs to feel upscale and the logo is simple enough to stitch well. The figures shown are indicative market midpoints rather than quotes, and the per-unit decoration cost, which is not shown here, moves the total in the opposite direction as quantity climbs.

    Specifying a bag you will be happy with

    Put together, a good custom crossbody spec names five things: the shell fabric and denier, the coating or water-resistance level, the hardware grade at the zipper and strap points, the decoration method matched to your artwork and quantity, and the colorways. A 420D or 600D coated polyester body with metal strap hardware and a covered zipper covers the vast majority of everyday use cases at a sensible price, and you scale up to nylon or ballistic reinforcement only when the use case genuinely demands it. Decide those inputs before you request a quote, and the numbers you get back will actually be comparable across suppliers instead of a pile of look-alike photos at look-alike prices.

  • What Strap Drop Should You Actually Order?

    Every crossbody spec sheet says adjustable and almost none of them says what to. The number that matters takes two minutes to work out.

    What drop means

    It is the vertical distance from the top of the shoulder to the top of the bag.

    It is not half the strap length, because the strap runs diagonally across the body.

    How to measure it without a sample

    Hang a tape from the top of the shoulder and mark where you want the bag to sit.

    For most adults, hip height is roughly 22 to 24 inches of drop.

    Why the range matters more than the maximum

    A strap that adjusts 40 to 55 inches serves a narrower band of people than it sounds.

    Ask for the drop range at the shortest and longest settings, on a stated body size.

    When to build two lengths instead

    If your audience spans a wide height range, two strap options beat one long one.

    It costs less than a return rate, and it is a decision to make before the sample.

  • The Complete Buyer’s Guide to Custom Crossbody Bags

    Crossbody bags are bought on a photograph of a panel and they die at a tab. Here is the order the questions should actually be asked in.

    How is the strap tab stitched?

    A bar-tacked box stitch spreads the load; a straight seam concentrates it into a line.

    Ask whether the webbing wraps the ring or butts against it. Wrapping wins every time.

    What is the hardware made of?

    Steel and zinc alloy look identical and do not last the same length of time.

    Welded rings cannot be pulled open. Split rings can, and eventually are.

    What drop does the strap produce?

    Drop, not length, is what you feel. Around 22 to 24 inches puts the bag on the hip.

    A range quoted only as adjustable may never reach a comfortable drop on a tall wearer.

    How wide is the strap?

    Width is comfort. A narrow strap is a cutting edge under a loaded bag.

    Thin round cords look best in photographs and are the fastest to become unbearable.

    And check the panel before you design for it

    Under seven inches wide, curved over a gusset, crossed by a zip. Design for that shape.

  • Anti-Theft Crossbody Bags: What Actually Works

    This category is sold with more confidence than it deserves. The features are genuinely useful, and the promise attached to them usually is not.

    Locking zip pulls

    They defeat the one-second unzip in a crowd, which is how most bags are actually opened.

    They do not resist a knife or a determined attempt with two hands and time.

    Cabled strap cores

    A steel or aramid cable through the webbing defeats a slash, which is a real technique.

    It does nothing for a bag left on a chair, which is how most bags are actually lost.

    Slash-resistant panels

    A mesh in the back panel resists a cut through the body of the bag.

    It adds weight and stiffness, so it is worth it on travel bags and rarely elsewhere.

    RFID pockets

    They block contactless reads and they cost almost nothing to include.

    Real-world skimming is far rarer than the category implies, and modern cards rotate codes.

    What none of them do

    Buy certainty. Every feature here buys time and effort, and that is the honest claim.

    Any supplier using the phrase theft-proof is telling you something about themselves.

  • How to Choose the Right Custom Crossbody Bag Size and Strap Length

    How to Choose the Right Custom Crossbody Bag Size and Strap Length

    The single decision that determines whether a crossbody bag gets worn daily or abandoned in a closet is size. Get it right and the bag disappears into your routine; get it wrong and you are either cramming essentials into a pouch or hauling a half-empty sack. Before you choose a print, a color, or a strap hardware finish, settle the dimensions and the fit. This guide walks through how to match a custom crossbody bag to real use, from interior capacity to strap length to the material that suits how the bag will actually live.

    Match the size class to what you actually carry

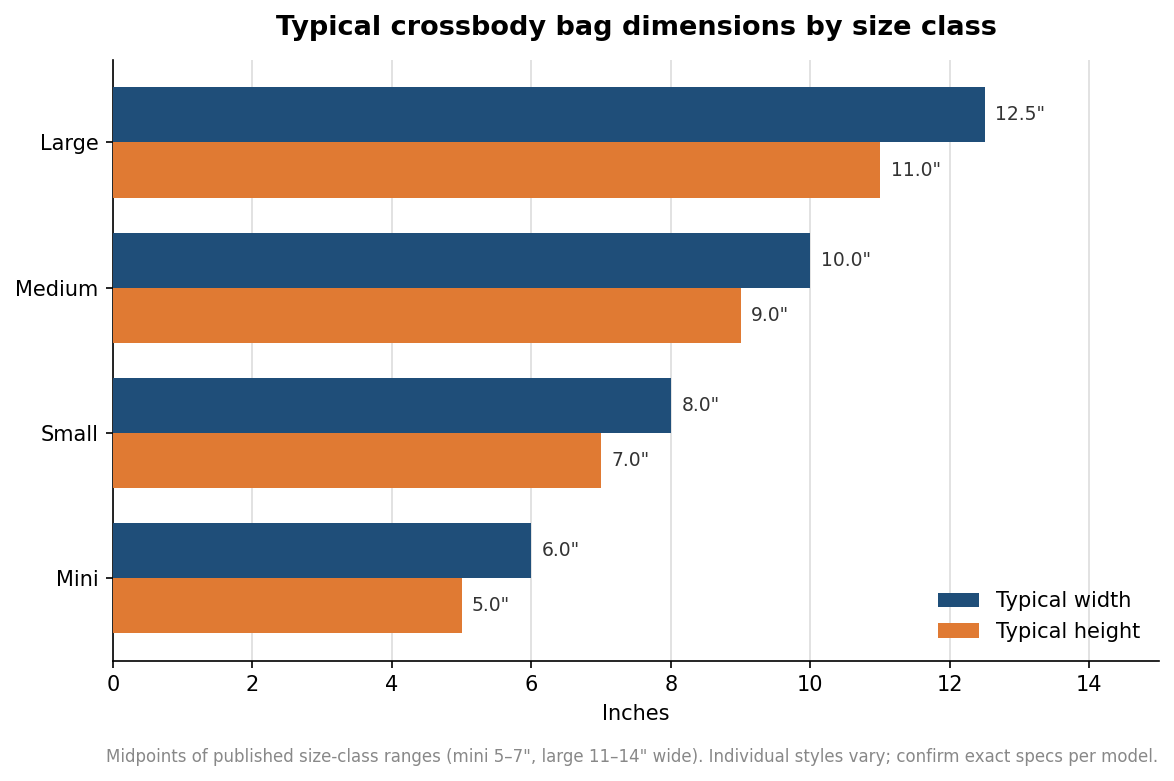
    Crossbody bags sort into four rough size classes, and each maps to a different daily load. Mini bags run about 5 to 7 inches wide and 4 to 6 inches tall. They hold a phone, a few cards, and a lip balm, and nothing more. They suit concerts, festivals, and coffee runs where you want your hands free and your load light. Small bags, roughly 7 to 9 inches wide and 6 to 8 inches tall, are the everyday workhorse: phone, full wallet, keys, and a compact makeup item fit without strain.

    Medium bags step up to about 9 to 11 inches wide and 8 to 10 inches tall, enough for a small tablet, a slim notebook, and a water bottle, which makes them the natural pick for work commutes or day trips. Large bags span 11 to 14 inches wide and 10 to 12 inches tall and will swallow a 13-inch laptop, travel documents, and a change of clothes. The tradeoff is bulk: a large crossbody worn across the body all day pulls on the shoulder in a way a mini never will. The chart below shows the typical width and height for each class so you can picture the footprint before committing.

    Grouped horizontal bar chart of typical crossbody bag width and height for mini, small, medium, and large size classes
    Typical width and height for each crossbody size class, from mini to large.

    These figures are midpoints of published size ranges rather than fixed standards, so always confirm the exact measurements of the specific style you are customizing. If you are deciding between two classes, think about the largest item you carry regularly, not the smallest. A bag that fits your tablet on the one day a week you need it is more useful than one that never does.

    Strap length is the other half of the fit

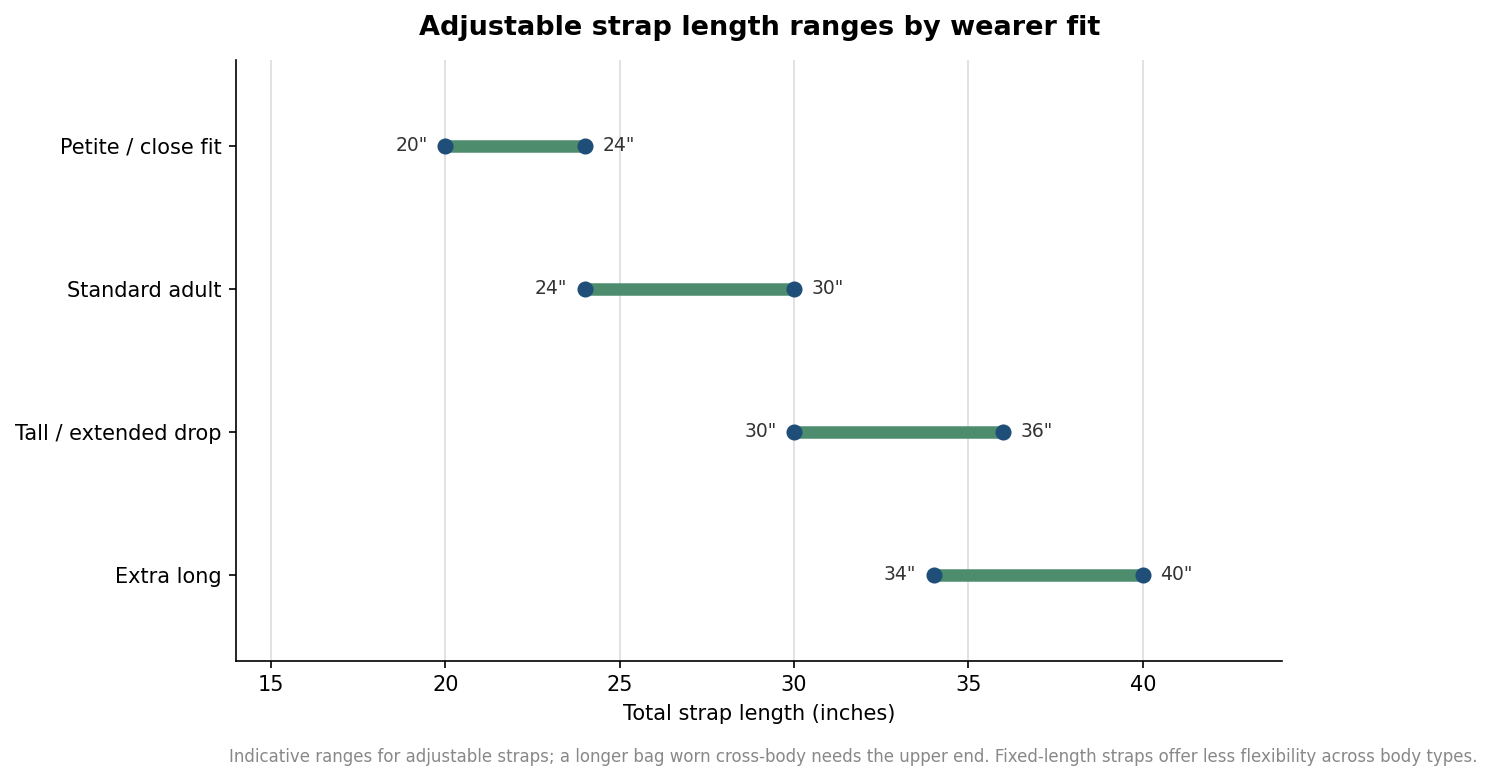
    Dimensions decide what goes inside; strap length decides how the bag sits on the body. A well-chosen size still fails if the strap rides too high under the arm or hangs past the hip. Adjustable straps solve most of this, and the useful ranges cluster into four bands. A petite or close fit uses roughly 20 to 24 inches of total strap length and keeps the bag high on the torso. A standard adult fit lands around 24 to 30 inches, placing the bag near the hip. Taller wearers or anyone who wants a lower, relaxed drop need 30 to 36 inches, and an extra long band of 34 to 40 inches suits layering over coats or wearing the bag low and casual.

    Range plot of adjustable crossbody strap length in inches for petite, standard, tall, and extra long fits
    Adjustable strap length ranges that suit different wearer heights and drop preferences.

    When you specify a custom bag, favor an adjustable strap with a wide travel range over a fixed length. A fixed strap is cheaper and cleaner-looking, but it forces every wearer into one drop height, which is a problem if the bag is a gift, a team uniform piece, or a retail product meant for a range of body types. If the design must use a fixed strap, size it for the middle of your intended audience and accept that the extremes will compromise.

    Choose the material for how the bag will be used

    Material affects weight, water resistance, durability, and, critically, which decoration methods will reproduce your artwork cleanly. Nylon and polyester are lightweight and easy to make water-resistant, which is why they dominate travel and everyday functional bags; they also take dye-sublimation printing well, letting you run edge-to-edge, full-color graphics that will not crack or peel. Canvas and cotton read casual and eco-minded and are best decorated with screen printing, embroidery, or a woven label rather than photographic prints.

    PU and vegan leather give a structured, premium look at a lower cost than hide, and they pair best with embossing, debossing, or a metal logo plate; printed graphics on these surfaces can look flat and are more prone to wear at stress points. Genuine leather ages attractively and justifies a higher price, but it is the least forgiving to customize and the hardest to keep consistent across a production run. Decide the decoration method and the material together, because a full-color logo that sings on sublimated polyester will disappoint as a heat transfer on grained PU.

    Plan quantities, lead times, and proofs before you order

    Custom bag production carries real constraints that are worth understanding up front. Minimum order quantities depend heavily on how custom the bag is: a semi-custom bag that decorates an existing blank has a far lower minimum than a fully bespoke design with custom patterns, hardware, and linings. As a rough planning rule, expect decorated blanks to be available in smaller runs while ground-up custom development requires committing to larger quantities to justify tooling and setup. Confirm the exact minimum with your supplier before you design, because it shapes what is economically sensible.

    Build in time for a physical proof or pre-production sample before the full run. A digital mockup confirms layout, but only a sample confirms how the print sits on the actual weave, how the color shifts on the real substrate, and whether the strap and zippers feel right. Approving a sample is the cheapest insurance against a run of bags that are technically correct and practically wrong. Treat lead times as indicative until your supplier quotes your specific job, since material sourcing, decoration method, and quantity all move the timeline.

    Work the decision in order: figure out the load, pick the size class, set the strap range, then choose a material and decoration method that fit both the look and the print. A crossbody bag that nails those four things becomes the one that leaves the house every day, which is the only real measure of whether the customization was worth it.

  • Hello world!

    Welcome to WordPress. This is your first post. Edit or delete it, then start writing!